Work in Table Cells
After you've inserted a table (How?), you can manipulate the cells for a more custom appearance.
Join Cells

Join two or more cells by highlighting them and in the Table tab Rows & Columns group click Join Cells. The dividing lines between the selected cells disappear.

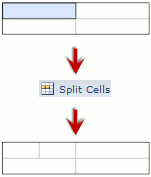
Split Cells
Split a single cell into more than one cell by selecting it and, just below the Join Cells button, click Split Cells. This divides the selected cell into two side-by-side cells.
Make Cells Uniform in Size
You can make all of your cells (or a selection of them) have the same width of rows or height of columns. To do this, either select the table or highlight the cells you want to affect, then just under the Split Cells button click Distribute. In the menu that appears, you can choose to Space Rows Evenly or Space Columns Evenly.
AutoFill a Row or Column With Automatic Text
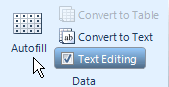
SmartDraw can automatically fill a column or row of your table with numbers, dates, months, or more. To do this click in a cell contained in the column or row you wish to fill, then in the Table tab Data group click Autofill.
This opens the "AutoFill Table" dialog box, where you select the type of information to fill, whether it will go down the column or across the row, and what range of information you want to list. Once you've made your selections, click OK and the numbering is placed in the cells, starting with the one you selected.
Lock or Unlock Cells to Text Editing
You may come across a cell which just turns blue when you click on it. This means that cell is locked. To lock or unlock a cell, select it, then uncheck or check (respectively) the Text Editing checkbox button in the Data group of the Table tab.
How to Format a Table >>