Use the Fill Menu
Apply Basic Colors
To change the fill of a symbol(s), select the symbol(s) (How?) and click Fill in the Shape Style group of the Home tab. Then choose from the menu.
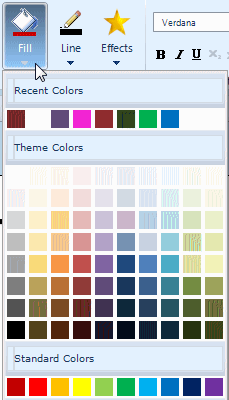
The top half of the Fill menu contains colors you've recently used, colors that go well with the selected theme, and standard colors. Click on any colored square to apply that fill.
The lower half of the Fill menu contains more advanced - but easy to use - options.
Apply Transparency, Gradients, Textures, and Hatches
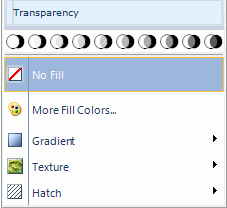
To choose a level of Transparency for the fill of the selected symbols, click one of the buttons in that section of the menu. You can also click No Fill to make the symbols 100% transparent.
To choose a color other than those shown above, click More Fill Colors.... This opens a dialog box where you can choose a color or enter HSL or RGB values for a color.
To choose a gradient, position your cursor over Gradient and click More Gradients in the menu that appears to create a custom gradient.
You can also choose a Texture or Hatch by positioning your cursor over those choices in the menu. SmartDraw has many textures to choose from, such as grass, wood finish, water, stone, paper, and more.
Filling Library Symbols
You can't fill all library symbols due to the nature of some symbols. However, we recommend you try to change the fill and line color of your symbols to see what actions are available. You can always undo! (How?)
How to Use the Line Menu >>